Tutorial: Arduino Uno + ARCTIC P12 Pro Wind Simulator
This tutorial explains a DashForge Wind Simulator setup using an Arduino Uno, two ARCTIC P12 Pro 4-pin PWM fans, and a dedicated 12V power supply.
The Arduino receives JSON lines from DashForge over USB Serial and outputs 25 kHz PWM on fan control pins.
Hardware Used
| Item | Purpose |
|---|---|
| Arduino Uno | Receives Wind Simulator JSON over serial and generates PWM |
| 2 x ARCTIC P12 Pro 4-pin PWM fans | Left and right cockpit airflow |
| 12V DC power supply | Powers the fans |
| USB cable | Connects Arduino to the Mac |
| Common ground wiring | Shares GND between Arduino and 12V supply |
Wiring Diagram
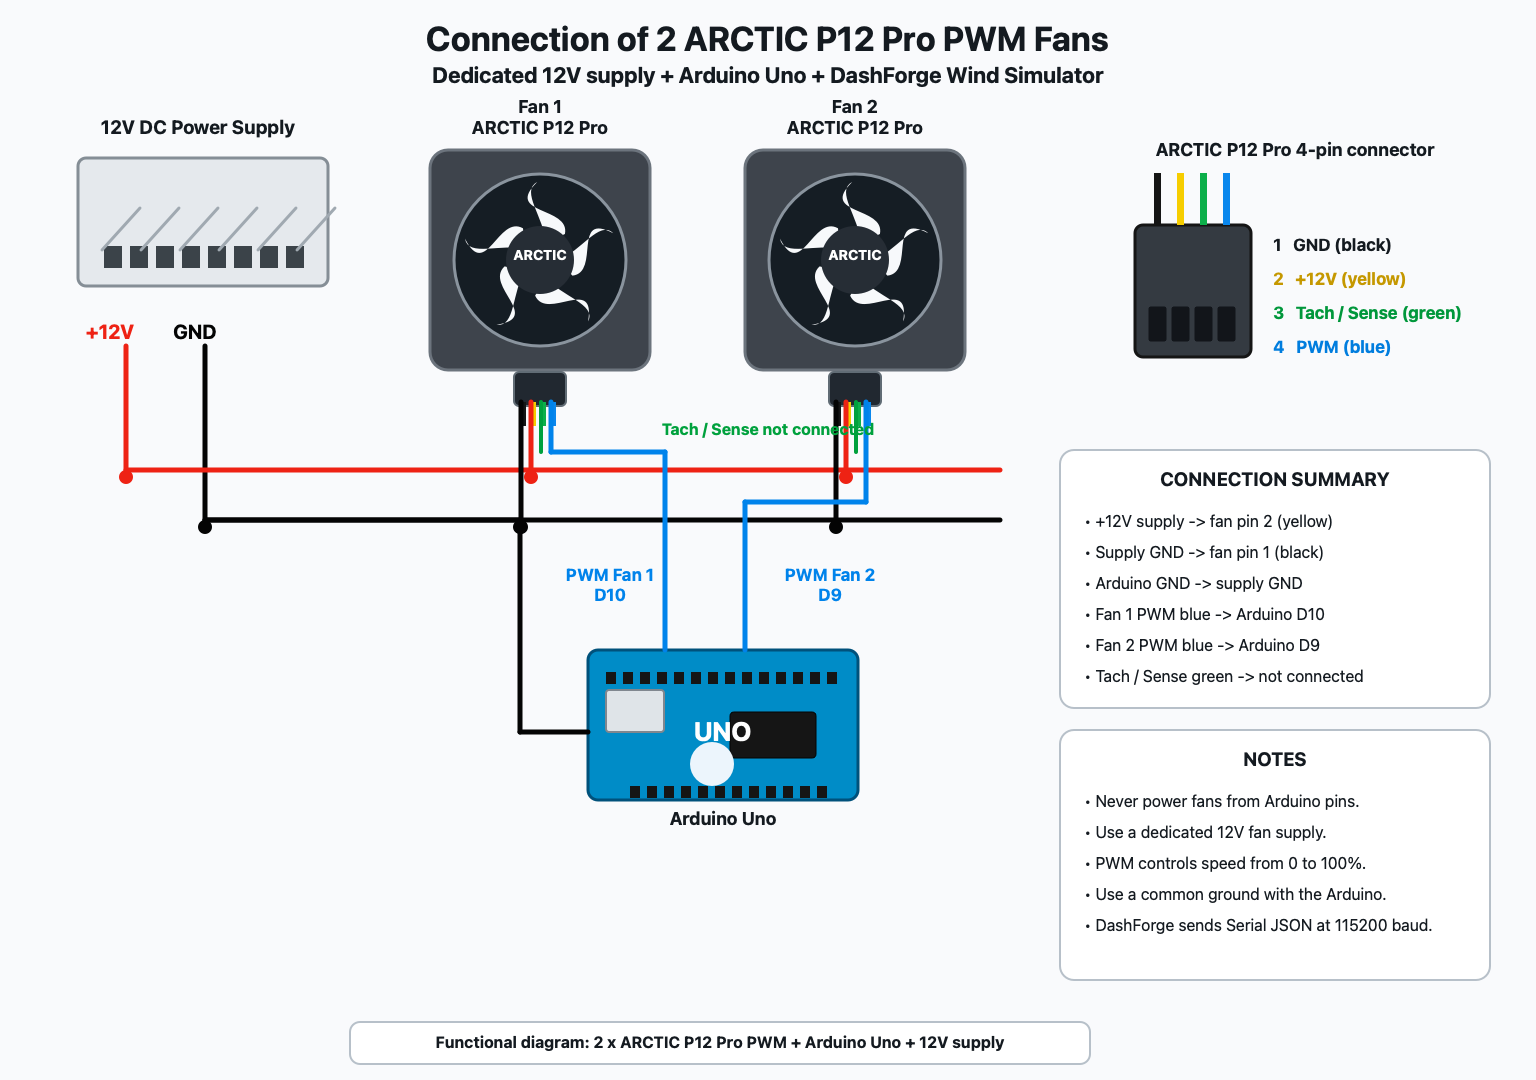
Important Wiring Rules
- Do not power the fans from the Arduino.
- Use a dedicated 12V supply for fan power.
- Connect Arduino
GNDto the 12V power supplyGND. - Fan yellow wire is
+12V. - Fan black wire is
GND. - Fan blue wire is PWM control.
- Fan green tach/sense wire can stay disconnected for this setup.
Pin Mapping
Your current Arduino sketch maps fans like this:
| DashForge placement | Arduino pin | Timer output |
|---|---|---|
right | D9 | Timer1 / OC1A |
left | D10 | Timer1 / OC1B |
center | D3 | Timer2 / OC2B |
For the two-fan build in the diagram:
| Fan | DashForge placement | PWM wire |
|---|---|---|
| Fan 1 | left | D10 |
| Fan 2 | right | D9 |
Arduino Library
Install ArduinoJson in the Arduino IDE:
- Open
Tools > Manage Libraries. - Search for
ArduinoJson. - Install the Benoit Blanchon ArduinoJson library.
Arduino Sketch
Create a new Arduino sketch and paste this complete source code:
#include <ArduinoJson.h>

// D9 + D10: Timer1 at 25 kHz
// D3: Timer2 at 25 kHz
const int LEFT_FAN_PWM_PIN = 10;
const int RIGHT_FAN_PWM_PIN = 9;
const int CENTER_FAN_PWM_PIN = 3;

// Timer1: 16 MHz / (1 x (639 + 1)) = 25,000 Hz
const uint16_t TIMER1_TOP = 639;

// Timer2: 16 MHz / (8 x (79 + 1)) = 25,000 Hz
const uint8_t TIMER2_TOP = 79;

void setupFanPwm25kHz() {
  pinMode(LEFT_FAN_PWM_PIN, OUTPUT);    // D10 / OC1B
  pinMode(RIGHT_FAN_PWM_PIN, OUTPUT);   // D9 / OC1A
  pinMode(CENTER_FAN_PWM_PIN, OUTPUT);  // D3 / OC2B

  // Timer1: D9 and D10, Fast PWM, TOP = ICR1
  TCCR1A = 0;
  TCCR1B = 0;

  TCCR1A =
      _BV(COM1A1) |  // Non-inverted PWM on D9
      _BV(COM1B1) |  // Non-inverted PWM on D10
      _BV(WGM11);

  TCCR1B =
      _BV(WGM13) |
      _BV(WGM12) |
      _BV(CS10);     // Prescaler 1

  ICR1 = TIMER1_TOP;
  OCR1A = 0; // D9
  OCR1B = 0; // D10

  // Timer2: D3, Fast PWM, TOP = OCR2A
  TCCR2A = 0;
  TCCR2B = 0;

  TCCR2A =
      _BV(COM2B1) |  // Non-inverted PWM on D3 / OC2B
      _BV(WGM21) |
      _BV(WGM20);

  TCCR2B =
      _BV(WGM22) |
      _BV(CS21);     // Prescaler 8

  OCR2A = TIMER2_TOP; // Frequency
  OCR2B = 0;          // D3 duty cycle
}

void setFanSpeed(const char* placement, int pwm) {
  pwm = constrain(pwm, 0, 255);

  if (strcmp(placement, "right") == 0) {
    // D9 / OCR1A
    OCR1A = map(pwm, 0, 255, 0, TIMER1_TOP);
  } else if (strcmp(placement, "left") == 0) {
    // D10 / OCR1B
    OCR1B = map(pwm, 0, 255, 0, TIMER1_TOP);
  } else if (strcmp(placement, "center") == 0) {
    // D3 / OCR2B
    OCR2B = map(pwm, 0, 255, 0, TIMER2_TOP);
  }
}

void setup() {
  Serial.begin(115200);
  setupFanPwm25kHz();

  setFanSpeed("left", 0);
  setFanSpeed("right", 0);
  setFanSpeed("center", 0);
}

void loop() {
  if (!Serial.available()) return;

  String line = Serial.readStringUntil('\n');
  line.trim();

  if (line.length() == 0) return;

  JsonDocument doc;
  DeserializationError error = deserializeJson(doc, line);

  if (error) {
    Serial.print("JSON error: ");
    Serial.println(error.f_str());
    return;
  }

  const char* type = doc["type"] | "";
  if (strcmp(type, "wind") != 0) return;

  JsonArray fans = doc["fans"].as<JsonArray>();

  for (JsonObject fan : fans) {
    const char* placement = fan["placement"] | "";
    int pwm = fan["pwm"] | 0;

    setFanSpeed(placement, pwm);
  }
}
Upload The Sketch
- Paste the sketch above into Arduino IDE.
- Select
Arduino Uno. - Select the correct USB port.
- Upload the sketch.
- Open Serial Monitor at
115200baud. - Close Serial Monitor before starting DashForge, because only one app can use the serial port at a time.
DashForge Serial Setup
- Open
Settings > Hardware. - Open Wind Simulator.
- Enable Wind Simulator.
- Add two fans:
Left Fanwith placementLeftRight Fanwith placementRight
- Add a Serial output target.
- Select the Arduino device from the detected serial list.
- Set baud to
115200. - Route both fans to that serial target, or keep them on
All targets. - Click Test Wind.
On macOS, the Arduino path usually looks like:
/dev/cu.usbmodemXXXX
Use the refresh button if you plugged the Arduino in after opening DashForge.
Recommended DashForge Settings
| Setting | Start value |
|---|---|
| Rate | 20 Hz |
| Curve | Smooth |
| Min Speed | 0-20 km/h |
| Max Speed | 160-220 km/h |
| Idle Output | 0-8% |
| Throttle Boost | 5-15% |
| Brake Reduction | 0-20% |
| Steering Split | 5-15% |
| Smoothing | 40-70% |
Fans do not need a high update rate. DashForge only sends packets when the PWM
value changes, so 20 Hz is usually enough.
Manual Test
Use Manual Control to test wiring without a game:
- Enable
Manual Control. - Move the left fan slider.
- Confirm only the left fan changes speed.
- Move the right fan slider.
- Confirm only the right fan changes speed.
- Disable
Manual Controlbefore returning to telemetry-driven wind.
If both fans move together, check that the fan rows are not both routed to the same placement or that the PWM wires are not bridged.
Packet Example
DashForge sends one JSON line per update:
{
  "v": 1,
  "type": "wind",
  "seq": 42,
  "speedKmh": 128,
  "fans": [
    {
      "name": "Left Fan",
      "placement": "left",
      "level": 0.54,
      "pwm": 138
    },
    {
      "name": "Right Fan",
      "placement": "right",
      "level": 0.48,
      "pwm": 122
    }
  ]
}
The Arduino sketch uses placement and pwm.
Troubleshooting
| Problem | Fix |
|---|---|
| Fans do not spin | Check 12V power, GND, fan black/yellow wires, and minimum PWM. |
| Arduino receives nothing | Close Serial Monitor, select the correct /dev/cu.* port, and use 115200 baud. |
| Fan direction is swapped | Swap DashForge fan placements or swap D9/D10 PWM wires. |
| Fans keep running after stop | DashForge sends zero levels when telemetry stops; check that the serial target is still connected. |
| JSON errors in Serial debug | Confirm ArduinoJson is installed and DashForge target is set to Wind Simulator serial output. |
Safety
- Never connect fan 12V to Arduino 5V.
- Keep grounds common.
- Use insulated terminals or a proper distribution block for 12V.
- Test with low manual PWM before driving.
- Add a physical power switch for the 12V fan supply.